
The conclusion tool uses data from the hypothesis scratchpad or question scratchpad, the data viewer and the observation tool. You need to include at least one of both scratchpads for the tool to work. To be able to fully use the tool, you should also include the data viewer and/or the observation tool.
Tips & Tricks
The data viewer will only work when you load data into the tool. You can either load data from the Experiment Design Tool or choose to enter data manually.
When you create an ILS you can choose if and how your students need to log in to enter the ILS. Go to the sharing menu of your ILS in the authoring environment Graasp.

Here you can find the standalone view setting. Below the option to choose a language, you find the options for logging in.
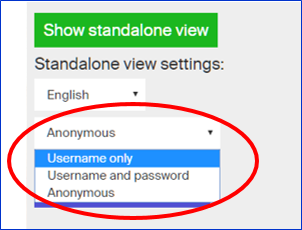
There are three options. The first one, ‘username only’, means that students only have to enter a nickname to access the ILS. If you choose the option ‘username and password’, students do not only enter a nickname but also a password to log in the ILS. This makes it harder for students to enter the ILSs of other students and prevents problems with similar nicknames. In both cases, if the student logs in the ILS later using the same credentials (i.e. respectively nickname or nickname and password), the work saved in the previous sessions will be displayed (e.g., hypothesis created, text written in the wiki or the input boxed, files uploaded, etc.). In the same way, the resources generated by the students will be accessible to the teacher. The last option, ‘anonymous’, allows you to share the ILS without requiring a nickname. It should be noticed that, in this mode, neither the students will be able to recover the work done, nor the teacher will be able to know who used the ILS.
The “Teacher feedback” app allows you to give feedback to individual students.

You place the app next to the app you like to comment on when the lessons is over. For example you place it after the Concept Mapper where students created a concept map, or after a notepad where they formulated an answer to a question. You can include the Teacher feedback app by choosing this app from the list of available apps in Go-Lab.

Once you have included the Teacher feedback app in your ILS you can prepare feedback for each student. Go to the “members” section in Graasp, look for “Standalone users” and select the student you like to give feedback.

You will enter this student personal ILS and see it as the student has used it (so the tools and notepads will include the input from the student). Be careful, any changes you make will be saved as if the students made these changes himself, except for the comments you put in the feedback tool. You now can type in your feedback in the app, which will look like this:

When the student opens the ILS he or she will see your feedback, but cannot edit it. You can place as many Teacher feedback apps in your ILS as you wish.
The Go-Lab authoring tool uses “autosave” which means that you never have to worry about saving your work. This process, however, always overwrites older versions. If, for example, you like to experiment with your ILS and like to keep the old version you may want to make a copy, This is easily done by opening the dialogue at your ILS icon. This process is further explained with a short movie at: http://www.golabz.eu/videos.

If you add a picture in your ILS you can resize it by using the “gear” symbol at the picture you had inserted.

The Inquiry Learning Space (ILS) can start with an information tab that tells the students what to expect and explains them the learning goals and structure of the ILS (see the figure below for an example). The difference with orientation phase is that in the orientation phase the prior knowledge of the students is revitalised, the main concepts of the domain are introduced and a general problem statement is given. The Intro phase is not there by default, so if you like to include it you have to create this phase yourself in the Go-Lab authoring environment Graasp (please see the Tips “You can change the phases of the inquiry cycle” and “Naming of the Inquiry Phases”).

Learning with online labs generally means that there is an interaction between extracting information from the lab itself and learning with other, more direct resources. Basically there are two standpoints:
- Labs and/or simulations are best used before other instructional materials (online resources, books, lectures), so that students are sensitive for the information to extract from the expository material.
- Before learning with an online lab, students should have sufficient knowledge to profit from their lab experiences.
As a general recommendation, it seems appropriate to use both approaches. This can be achieved by giving a brief preview of the lab in the orientation phase, so that students can make themselves familiar with the lab and get sensitive for the issues they need to find out. In the conceptualization phase, background information can be presented. This can be done directly in the conceptualization phase by linking to other web sources, or offline in a lecture. In the investigation phase, students then return to the lab and make their full inquiry.
If an Inquiry Learning Space (ILS) is used in a stand-alone version, care must be taken that students have the necessary background knowledge and understand all the terminology that is used in the ILS. If this is not the case, this information can be given concurrently with the ILS. There are a few options to do this:
- In the orientation and conceptualisation phase, necessary prior domain information can be directly displayed (as text, diagrams, videos, etc.).
- Internet links to background information can be included in each phase (using the insert link icon
 ), some permanent information can also be displayed under the tools bottom bar (see tooltip Make use of the general tool facility).
The Go-Lab inquiry cycle has a number of phases for which we have chosen names that characterize the main cognitive activities for students. The Go-Lab names are: Orientation, Conceptualisation, Investigation, Conclusion, and Discussion. The Conceptualisation, Investigation and Discussion phase can be divided in several sub phases. The next table displays a short description of the different phases.
| Orientation | First conjectures; What is this about? |
| Conceptualisation | Theory; What do you think? |
| Question | Issue; Challenge |
| Hypothesis | Idea; Proposition |
| Investigation | Study |
| Exploration | Play around |
| Experimentation | Research |
| Data Interpretation | What do I see? |
| Conclusion | Decision; Result |
| Discussion | Dialogue; Deliberation |
| Reflection | Consideration |
| Communication | How to tell someone else? |
Students can go through these phases one by one, starting with Orientation and ending with the Discussion phase, but they can also take different routes and go back and forward between phases. The diagram below shows several possibilities.

Using the Go-Lab authoring system Graasp, you can change the order of the phases and delete or add phases to meet your specific wishes. The names of the phases can be changed and adapted as well, allowing you to use terminology more familiar to your students. Make sure to adapt any of academic language within the phases as well, to match your students understanding. You can change the name of a phase in Graasp by clicking the name and typing the new name. Confirm by clicking the check mark.

Go-Lab tools (or Go-Lab inquiry apps, e.g., the concept mapper, the hypothesis/question scratchpad, the experiment design tool) can offer students pre-defined concepts of the domain. These concepts can be inserted through the configuration option (![]() ) of these tools. This option is available when you use a tool in the authoring environment Graasp, but not in when you use the tool in the stand alone view. When you add the Concept Mapper for example, it offers a few pre-defined concepts like the ones depicted in the tool below. Make sure you adapt these terms to match the domain of your ILS, or delete them all together if you wish.
) of these tools. This option is available when you use a tool in the authoring environment Graasp, but not in when you use the tool in the stand alone view. When you add the Concept Mapper for example, it offers a few pre-defined concepts like the ones depicted in the tool below. Make sure you adapt these terms to match the domain of your ILS, or delete them all together if you wish.

In this Questioning Scratchpad the building blocks are adapted by the teacher to match the domain of the ILS.

Another option is to not only provide students with pre-defined terms, but to go one step further and offer them partially filled tools. For example you can offer an (incomplete) concept map in the Concept Mapper tool or a set of hypotheses in the Hypothesis Scratchpad. This may help students who are not as yet very proficient in the larger domain and/or experimentation. You can prepare these (partially) filled tools in the authoring environment Graasp. Anything you create in a tool while you are in the authoring view (e.g. a set of hypotheses), will be visible for the students when they start up the ILS.
Tools (or Go-Lab inquiry apps) that are offered in an Inquiry Learning Space (ILS) are most probably new for students. This means that a tool should be accompanied by some instruction for students on how to use it. This also, or maybe even stronger, holds for general tools such as note pads. If students are asked to fill these notepads in, it might be effective to give them topics or headings to use and in any case make explicit what is expected from them. Also, if you ask students to make questions or hypotheses, it may be wise to tell them, especially for inexperienced students, how many you expect.
Go-Lab tools (or Go-Lab inquiry apps) have a help button for students. As an author, you can adapt this help through the configuration button in the authoring phase. The help becomes visible when students click the “?” button on the tool.

One of the key characteristics of inquiry learning is that students have to find out something themselves, an investigation is always the backbone of an inquiry process. As part of the student’s initiation and guidance, it may be a good idea to include a much guided, structured, step-by-step, exercise, but inquiry also means that student-led investigations are present. Therefore, an ILS should not be a mere sequence of step-by-step instructions for the student to follow like a recipe cookbook. There must be an inquiry aspect where the student searches for and tries various possible solutions. It is ok if the student initially fails and repeats a process. So, instead of telling a student which values to fill in for each variable, students should find out themselves what are the interesting values to use; of course, you can give them predefined experiment to follow (and you can define those experiments in the Experiment Design Tool), but there should be freedom for students as well.
When you create an Inquiry Learning Space from a lab, Go-Lab offers you a set of predefined phases. You can add phases as you like and also rename them as you like (please see the Tip “Naming of the Inquiry Phases”). See this ILS as an example:

Adding a phase can easily be done by clicking the “+” sign in Graasp (the Go-Lab authoring environment).

Then use the create space button. Order of spaces can be changed by dragging them around.

If a phase in an Inquiry learning Space (ILS) is too long, students may lose focus as they have to scroll down too much. In this case you may decide to split a phase into two smaller phases (two tabs in the Inquiry Learning Space) and make sure you provide a connection between them. See the Tip “You can change the phases of the inquiry cycle” on how to add Phases to an ILS.

There should be a connection between inquiry phases so the students progress logically from phase to phase. You can reach that by including at the end of each phase a brief sentence that marks the transition to the next phase. See this example:

Introduce the main goals and expectations of each inquiry phase at the beginning of the phase.

Try to use a diversity of information sources (videos, text, animations, pictures, diagrams etc.). For complex concepts, use text plus multimedia resources (animations, videos) to reinforce learning the domain specific content (do not rely on one method of delivering information!).
Do not include too many videos and don’t choose too long videos - two minutes should be the approximate maximum (although there will be exceptions, of course).
Videos should have good visual and sound quality (i.e., brightness needs to be suitable to see what is happening and sound should not include excessive static or background noise).
Videos accompanied only with music (no voice-over explanations) should have accurate textual cues to explain what is happening during the viewing of the visual imagery.
Also please note that if you embed videos in Graasp (by dragging them into the ILS) and many students start the ILS at the same time (when your lesson begins) this may result in longer loading times. You may reduce this by linking the videos from YouTube.
Here, make sure that you provide enough information about how to use the lab. If working with a complicated simulation or lab, chop the investigation into different parts with different assignments, so your students don’t get overwhelmed. You can include a lab multiple times in your ILS. You can include a small video or manual before students start using the lab.


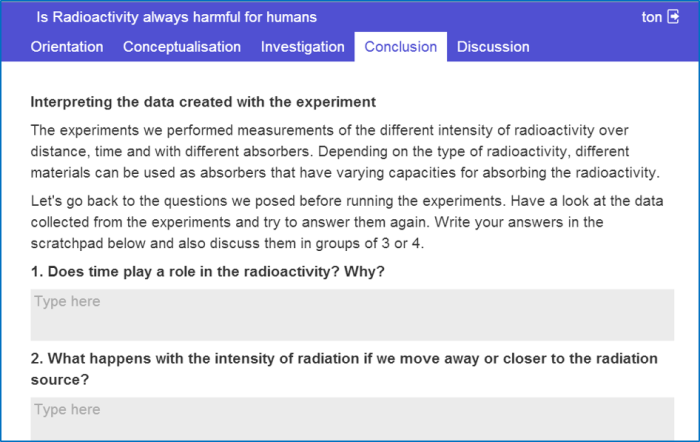
The most obvious approach in the conclusion phase is to ask the students to revise their hypothesis, select relevant data sets and observations, and adapt, if necessary, the hypothesis. This activity can be supported with the Go-Lab Conclusion tool.
To further support students, some statements or questions can be defined to be answered by the students. In some cases, the students may have to go back to previous phases to view those statements.
Examples:
- What is the influence of the sea breeze on the development of clouds?
- Is the total momentum (on the x-y plane) you calculated zero? If not, why is it not zero?
You can use the Input Box app to give students the opportunity to note down their answers.

Questions for the students can be posed through the Quiz Master app. These questions are multiple choice questions, but you can also place questions in the ILS as such. In the latter case:
- Questions should be written in such a way that a simple Yes or No answer is insufficient. Students need to justify their answers by explicitly explaining the thought process behind how or why they did something.
- Questions should be answerable in a text editing tool (e.g., Scratchpad tool) or indirectly answerable in a tooling tool (e.g., Concept Mapper). Rhetorical questions that cannot be answered somewhere in the ILS are not advised.
In the conceptualization phase, you may ask the students to explicate their current ideas by introducing the Question and/or Hypothesis Scratchpad. Students can then perform experiments to see if their questions are answered or their hypotheses are confirmed or refuted. To relate questions and/or hypotheses with the data from the experiments, you may want to use the Conclusion Tool from the Go-Lab set of tools. But, if you don’t, in any case, in the conclusion phase come back to the questions or hypotheses students have raised or the questions you may have raised yourself in the start of Inquiry Learning Space (ILS).
You can make the Inquiry Learning Space (ILS) visually more attractive by using different background images for each phase. This will make it also more clear for students that they are changing phases.

You can change the background of a phase in Graasp by clicking the wheel next to a phase.

You can change the language in which the authoring environment Graasp is presented. This means that all titles, buttons etc. in Graasp will be shown in the language of your choice.

You can change the language of an Inquiry Learning Space separately. You select per ILS the language that you want. The language of all Go-Lab tools (inquiry learning apps) will be automatically adapted (if a translation is available). Some of our labs are also available in variety of languages. Please check the lab information at Golabz.eu to find out which language is available for each lab. You should still translate the names of the ILS phases yourself (please see the Tip “Naming of the Inquiry Phases”).

Inquiry learning is a time consuming process, especially if it is new for students. This may take more time than you had expected. If you are in doubt, only use a limited number of Go-Lab tools (inquiry learning apps).
You can use Go-Lab tools (inquiry learning apps such as the hypothesis scratchpad) in different phases of an Inquiry Learning Space. You can also make general tools (such as a calculator or a periodic table) available for all phases through the bottom tool bar of an ILS.

You can add a tool to the general toolbar by adding it in Graasp at the same level as the ILS phases; it will then automatically appear in the bottom toolbar for the students. See the calculator example below.

Provide students who have little prior knowledge with more guidance:
- Include the Experiment Design Tool (EDT) to help them plan their experiments. Explain the purpose of experimentation (and the importance of varying one thing at a time if appropriate) and give an elaborate demonstration of how to operate the EDT.
- Tell them which variable they need to vary in their experiment, and which variables they need to keep constant, instead of letting them figure this out themselves. This helps them conduct well-designed experiments from which they can better draw conclusions. You can do this by configuring the EDT with a readymade experiment yourself, so that students will start with this experiment when they go in their ILS.
Provide students who have some prior knowledge with less guidance.
- Do not include the Experiment Design Tool (EDT) for students who have already quite prior knowledge. They will gain an equal amount of knowledge when they use the EDT compared to when they don’t use the EDT, but they can get frustrated because they already know what they need to do.
- Do not tell them which variable they need to vary in their experiment and which variables they need to keep constant. They don’t need this additional guidance; just let them figure it out themselves!
When you create an ILS you can work together with a colleague and share responsibility for the ILS creation. You can easily invite a colleague in Graasp (the Go-Lab authoring facility) to become co-author. Go the upper right hand part of your screen and select “members”. Type the name of your colleague (who needs a Graasp account) and enter the name:

Click on the “viewer” underneath the person’s name and change the person’s role from “viewer” to “editor” or “owner”.
